
egg incubator instructions
An egg incubator is a vital tool for hatching eggs, providing a controlled environment for temperature, humidity, and turning, essential for successful chick development and high hatch rates.
1.1 What Is an Egg Incubator?
An egg incubator is a device designed to replicate the natural conditions provided by a mother hen, maintaining optimal temperature, humidity, and turning eggs to ensure proper embryo development. It is essential for hatching eggs successfully, offering a controlled environment that promotes healthy growth and high hatch rates for various bird species.
1.2 Benefits of Using an Egg Incubator
An egg incubator offers precise control over temperature, humidity, and egg turning, ensuring consistent conditions for embryo development. This leads to higher hatch rates and healthier chicks. It simplifies the hatching process, allowing for better monitoring and reducing the risk of human error. With an incubator, you can hatch multiple eggs simultaneously, making it a convenient and efficient method for both beginners and experienced breeders.
Choosing the Right Incubator
Selecting the right incubator involves considering capacity, budget, and features like automatic turning and humidity control. Ensure it meets your needs for successful egg incubation and hatching.
2.1 Features to Look for in an Incubator
When selecting an incubator, look for features like automatic egg turning, precise temperature control, and humidity management. Ensure it has a clear viewing window, adequate capacity, and easy cleaning. Automatic turners reduce manual effort, while accurate thermometers and hygrometers maintain optimal conditions. Durable construction and user-friendly designs are also crucial for long-term use and successful hatching outcomes.
2.2 Budget and Capacity Considerations
Your budget and the number of eggs you plan to hatch are key factors. Incubators vary widely in price, from basic models under $100 to advanced units over $500. Consider how many eggs you need to incubate simultaneously, as capacity ranges from a dozen to several hundred. Avoid cheap, low-quality options that may compromise hatch rates and durability.
Preparing the Incubator
Set up the incubator 24 hours in advance to ensure temperature and humidity stabilize. Sterilize with a bleach solution, calibrate settings, and add water to the humidity pan.
3.1 Setting Up the Incubator 24 Hours in Advance
Before adding eggs, set up the incubator 24 hours in advance to stabilize temperature and humidity. Place it in a draft-free room, ensure the heating element is working, and preheat to the recommended settings. This preparation ensures a consistent environment for the eggs, promoting healthy embryonic development and increasing the chances of a successful hatch.
3.2 Sterilization and Calibration
Sterilize the incubator with a diluted bleach solution to prevent bacterial contamination. Calibrate the temperature and humidity controls according to the manufacturer’s instructions. Ensure accurate readings using a hygrometer and thermometer. Proper calibration guarantees optimal conditions for embryonic development, while sterilization safeguards against infections, both critical for a successful hatching process.
Collecting and Storing Hatching Eggs
Handle eggs gently, store pointy side down in a clean, cool place. Allow eggs to reach room temperature before incubation to prevent cracking and ensure viability.
4.1 Handling and Storing Eggs Before Incubation
Eggs should be handled gently to avoid cracks. Store them pointy side down in a clean, dry place at room temperature (around 70-75°F). Avoid washing eggs, as it removes the protective bloom. Allow eggs to rest 24 hours before incubation to prevent cracking. For shipped eggs, hold them pointy side down for 24 hours, tilting slightly every 12 hours to prevent embryo sticking. Discard any broken or leaking eggs to maintain incubator hygiene and prevent contamination.
4.2 Allowing Eggs to Reach Room Temperature
Before incubation, eggs must reach room temperature (about 70-75°F) to prevent cracking and ensure even heating. Place them pointy side down in a clean, dry space. Avoid sudden temperature changes. Shipped eggs may need 24-48 hours to settle after arrival. This step ensures yolks stabilize, reducing embryo movement and potential issues during incubation, promoting a successful hatch rate.
Setting Up the Incubator and Placing Eggs
Properly set up the incubator 24 hours in advance. Place eggs on their sides or pointy end down, ensuring they fit securely. Use automatic turners if available.
5.1 Positioning Eggs in the Incubator
Place eggs on their sides or pointy end down, depending on the incubator type. Ensure eggs fit securely, allowing proper airflow. For automatic turners, align eggs as instructed. For manual turning, position eggs with the large end up initially. Test the roll of eggs to confirm smooth movement. Marking eggs with an X and O helps track turning consistency. Proper positioning ensures even heating and development.
5.2 Marking Eggs for Turning
Mark eggs with a soft pencil to track turning. Place an X on one side and an O on the other. This ensures consistent rotation during incubation. Marking helps verify if eggs have been turned, even with an automatic turner. Proper tracking supports even embryo development and prevents issues. Marking is a simple yet crucial step for optimal incubation management and successful hatching outcomes.
Monitoring Temperature and Humidity
Monitor temperature and humidity closely using thermometers and hygrometers. Maintain 99-100°F and 50-60% humidity. Adjustments may be needed based on environmental conditions to ensure optimal incubation.
6.1 Maintaining Optimal Temperature Levels
Maintain the incubator temperature between 99°F and 100°F for optimal hatching. Use a reliable thermometer to monitor levels and ensure stability. Calibrate the incubator before use to avoid fluctuations. Place the incubator in a draft-free area to prevent sudden temperature changes. Regular checks are essential to maintain consistent heat, which is critical for proper embryo development and a successful hatch.
6.2 Adjusting Humidity During Incubation
Maintain humidity levels between 50-60% during incubation and increase to 65-70% during hatching. Add water to the reservoir as needed to raise humidity, or adjust ventilation to lower it. Use a hygrometer to monitor levels. Proper humidity ensures healthy embryo development and prevents issues like stuck chicks during hatching. Avoid extreme fluctuations to maintain optimal conditions for successful hatching.

Turning the Eggs
Turning eggs is crucial for proper embryo development. Eggs can be done manually every 6-8 hours or via an automatic turner. This prevents the embryo from sticking to the shell membrane, ensuring proper development.
7.1 Manual Turning: Frequency and Technique
For manual turning, eggs should be turned every 6-8 hours to ensure proper embryo development. Gently roll the eggs from one side to the other, ensuring even movement. Marking eggs with an “X” and an “O” helps track turning consistency. Avoid over-turning, as this can disrupt incubation. Maintain gentle handling to prevent damage and keep the incubator stable during the process.
7.2 Using an Automatic Egg Turner
An automatic egg Turner simplifies incubation by rotating eggs at set intervals, ensuring even embryo development. Place eggs pointy-end down in the Turner tray and follow the manufacturer’s instructions. This eliminates manual turning, reducing handling and potential disruptions. Regularly check the Turner’s operation to ensure smooth rotation and optimal incubation conditions for successful hatching.
Candling Eggs
Candling involves shining a bright light through eggs to monitor embryo development. Best done on Days 7 and 14, it helps identify viable eggs and detect issues early.
8.1 When and How to Candle Eggs
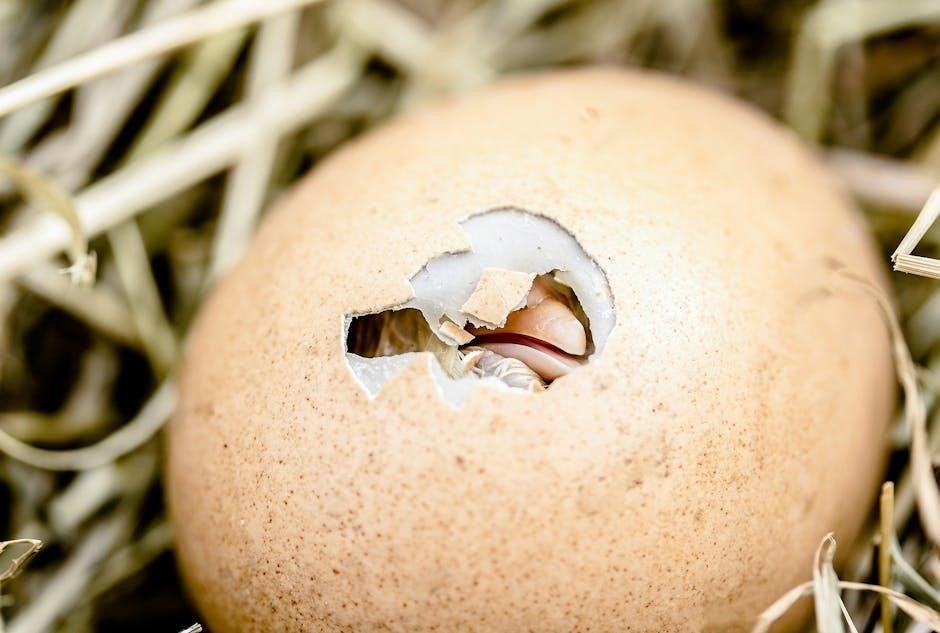
Candling is typically done on Days 7 and 14 of incubation. Use a bright light source to illuminate the egg, allowing visualization of the embryo’s growth. On Day 7, a dark spot with blood vessels should be visible, resembling a spider. By Day 14, the embryo is larger, making it harder to see through the shell. This process helps identify non-viable eggs and ensures healthy development of the embryo. Regular candling aids in maintaining optimal incubation conditions and maximizes hatch success rates.
8.2 Identifying Developmental Issues
During candling, inspect for developmental issues like cracks or abnormal growth. On Day 7, a dark spot with blood vessels should be visible. By Day 14, the embryo should be larger. If no development is seen on Day 7, the egg is likely infertile. On Day 14, if the embryo hasn’t grown, it’s non-viable. Remove any cracked or abnormal eggs to prevent contamination and ensure a successful hatch.

The Lockdown Period
The lockdown period begins on Day 18, stopping egg turning and increasing humidity to 65-70%. This critical phase ensures chicks position themselves correctly for hatching.
9.1 Preparing for Hatching (Day 18-21)
During Days 18-21, stop turning eggs and increase humidity to 65-70%. Ensure the incubator remains stable, avoiding temperature fluctuations. This phase is crucial as embryos finalize development and prepare to pip. Monitor closely but avoid opening the incubator until chicks have fully hatched and dried, typically by Day 21, ensuring a successful hatch.
9.2 Increasing Humidity for Hatching
During hatching, increase humidity to 65-70% by adding water to the incubator’s reservoir. This creates the moist environment chicks need to pip and zip successfully. Avoid opening the incubator excessively to maintain stable conditions, ensuring proper shell membrane detachment and successful emergence of healthy chicks.
Hatching Day and Post-Hatch Care
On hatching day, monitor the incubator closely as chicks emerge. Once fully hatched, transfer them to a brooder with heat, water, and food for optimal growth and health.
10.1 Observing the Hatching Process
On hatching day, monitor the incubator closely as chicks begin to pip and zip. Listen for peeping sounds and observe eggs rocking gently. Avoid opening the incubator during hatching to maintain humidity and temperature stability. Chicks typically emerge fully within 24 hours, so patience is key. Once a chick is dry and active, it’s ready to move to a brooder for further care.
10.2 Transferring Chicks to a Brooder
Once chicks have fully hatched and dried, transfer them to a prepared brooder. Ensure the brooder has adequate heat, water, and bedding. Handle chicks gently to minimize stress. Place them near the heat source initially, then allow them to explore. Remove any chicks with visible health issues for closer observation and care. Ensure the brooder is safe and free from drafts to promote healthy growth.

Cleaning and Maintenance
After hatching, sanitize the incubator with a 1:10 bleach solution. Regularly clean and disinfect to prevent bacteria growth, ensuring a hygienic environment for future use and optimal hatch rates.
11.1 Sanitizing the Incubator After Use
Sanitize the incubator post-use with a 1:10 bleach-water solution. Ensure all surfaces, including trays and water reservoirs, are disinfected. Rinse thoroughly to remove chemical residue, ensuring a clean, hygienic environment for future hatching. Regular maintenance prevents bacterial growth, safeguarding chick health and improving hatch rates in subsequent uses of the incubator.